Android WebView TestCode 작성하기 기본 테스트 진행하기
본문
Android WebView javascriptInterface 사용하는 방법에 대해서 정리했었습니다.
오늘은 2번째 글로 WebView에 대한 TestCode 작성하는 방법을 정리해보려고 합니다.
- test runner
- test rule
- espresso : UI 테스트를 위한 도구
- uiautomator : 시스템 UI를 테스트해볼 수 있음(Alert 등)
- dexmaker mockito : mock 테스트를 진행할 수 있음
- awaitility : Thread sleep과 비슷함
가장 기본이 되는 Android TestCode 작성은 다음의 글을 참고하시면 되겠습니다.
다음 글에 사용된 예제의 링크
관련 글
- Android WebView javascriptInterface 사용하기
- Android WebView TestCode 작성하기 기본 테스트 진행하기
- Android WebView TestCode 작성하기 확장(Alert, Script 만들어 테스트)
- Android WebView Kotlin Base 코드 정의 살펴보기
- Android WebView Kotlin TestCode 작성하기
TestCode 작성에 사용한 API
다음의 Test API를 사용하였습니다.
Presenter TestCode
Presenter에 대한 TestCode를 먼저 정리하겠습니다.
Presenter는 실제로 화면에 그려졌는지를 테스트하는 게 아니라 함수 호출에 이상이 없는지 Presenter에서 처리 후 View에서 잘 받아지는지 정도를 확인하는 간단한 테스트를 진행하였습니다.
MainPresenterTest에는 View와 Presenter을 생성합니다.
@Before에서 view와 presenter을 각각 초기화합니다.
presenter에는 mock을 통해서 생성한 View를 attachView에 세팅합니다.
private MainContract.View view;
private MainContract.Presenter presenter;

@Before
public void setUp() throws Exception {
    view = mock(MainContract.View.class);
    presenter = new MainPresenter();
    presenter.attachView(view);
}
아래와 같이 간단한 테스트를 진행하였습니다.
웨의 인터페이스는 getCustomJavaScript에서 updateKeyword을 호출하면 실제로는 Presenter에서 받아서 View의 updateKeyword를 호출하게 만들어져있어서 다음과 같이 테스 진행해볼 수 있습니다.
@Test
public void testUpdateKeyword() throws Exception {
    // updateKeyword call...
    presenter.getCustomJavaScript().updateKeyword("Keyword change");

    // Then
    verify(view).updateKeyword("Keyword change");
}
updateKeyword에서 keyword change라고 전송하고 verify을 통해 updateKeyword에 온 데이터가 keyword change임을 확인하고 정상이면 Test가 통과하게 되는 간단한 테스트 작업입니다.
UI Test
이번에는 espresso을 통해서 UI 테스트를 진행할 수 있습니다.
UI 테스트에 참고한 목록은 다음과 같습니다.
MainFragmentTest를 진행하였고, 총 2개의 Activity를 활용하였습니다. 제가 만든 Sample.html 페이지에서 WebView Change event가 발생하면 2번째 Activity로 화면이 이동하고, 거기에서 새로운 URL을 렌더링 하게 됩니다.
WebView 테스트를 위한 onWebView dependencies 추가하기
onWebView를 통해서 WebView를 테스트할 수 있습니다.
onWebView는 Espresso.onView Espresso의 onWebView이고, dependencies는 다음과 같습니다.
'com.android.support.test:runner:0.5'
'com.android.support.test:rules:0.5'
'com.android.support.test.espresso:espresso-core:2.2.2'
'com.android.support.test.espresso:espresso-web:2.2.2'
그리고 위의 espresso을 사용하게 되면 gradle 파일에 다음의 코드도 포함되어야 합니다.
packagingOptions {
    exclude 'META-INF/maven/com.google.guava/guava/pom.properties'
    exclude 'META-INF/maven/com.google.guava/guava/pom.xml'
}
UI Test를 위한 IntentsTestRule 초기화
UI Test를 초기화하였습니다. 테스트는 MainActivity.java를 rule으로 활용하고 Activity, Context를 활용하게 됩니다.
@Rule
public IntentsTestRule<MainActivity> rule = new IntentsTestRule<>(MainActivity.class);
WebView Load 대기하기
WebView 로딩이 완료되었음을 확인하고 다음을 진행하는 것이 좋겠습니다.
별도의 Callback을 사용하지는 않고 다음과 같은 방법으로 WebView 로드가 성공적인지 확인하는 코드입니다.
onWebView()에서 withNoTimeout을 통해서 모든 로드가 완료되었을 때까지 기다릴 수 있습니다.
check를 통해서 로드된 웹페이지의 URL을 체크를 진행하는데, 현재 URL을 가져와서 비교하고 이상이 없으면 다음을 진행하게 됩니다.
Atoms.getCurrentUrl(): 현재 로드된 웹뷰 URL을 가져옵니다.Atoms.getTitle(): 현재 로드된 웹뷰 Title을 가져옵니다.
private void waitWebViewLoad() throws Exception {
    onWebView()
            .withNoTimeout()
            // Check current url
            .check(webMatches(getCurrentUrl(), containsString(MainFragment.DEFAULT_URL)));
}
onWebView 기본 테스트
onWebView를 사용하여 가장 기본적인 check를 진행하는데 실제로는 webContent의 hasElementWithId를 통해서 다음의 element가 포함되었는지를 확인합니다.
search_keyword: 검색 input boxupdateKeywordBtn: 검색 input box의 값을 넘겨주는 buttonshowAlertBtn: Alert dialog를 호출합니다.message:<p>태그로 message를 출력합니다.
다음의 element가 없다면 FAIL이 떨어지게 됩니다.
@Test
public void testHasElement() throws Exception {
    waitWebViewLoad();

    onWebView()
            .check(webContent(hasElementWithId("search_keyword")))
            .check(webContent(hasElementWithId("updateKeywordBtn")))
            .check(webContent(hasElementWithId("showAlertBtn")))
            .check(webContent(hasElementWithId("message")));
}
Web에서 Android javascriptInterface 호출
WebView에 있는 Script를 통해서 가장 기본적인 javascriptInterface 호출에 이상이 없는지 체크하게 됩니다.
사용자의 행동은 다음과 같을 수 있습니다.
- input에 키워드를 입력합니다.
- Update keyword 버튼을 누릅니다.
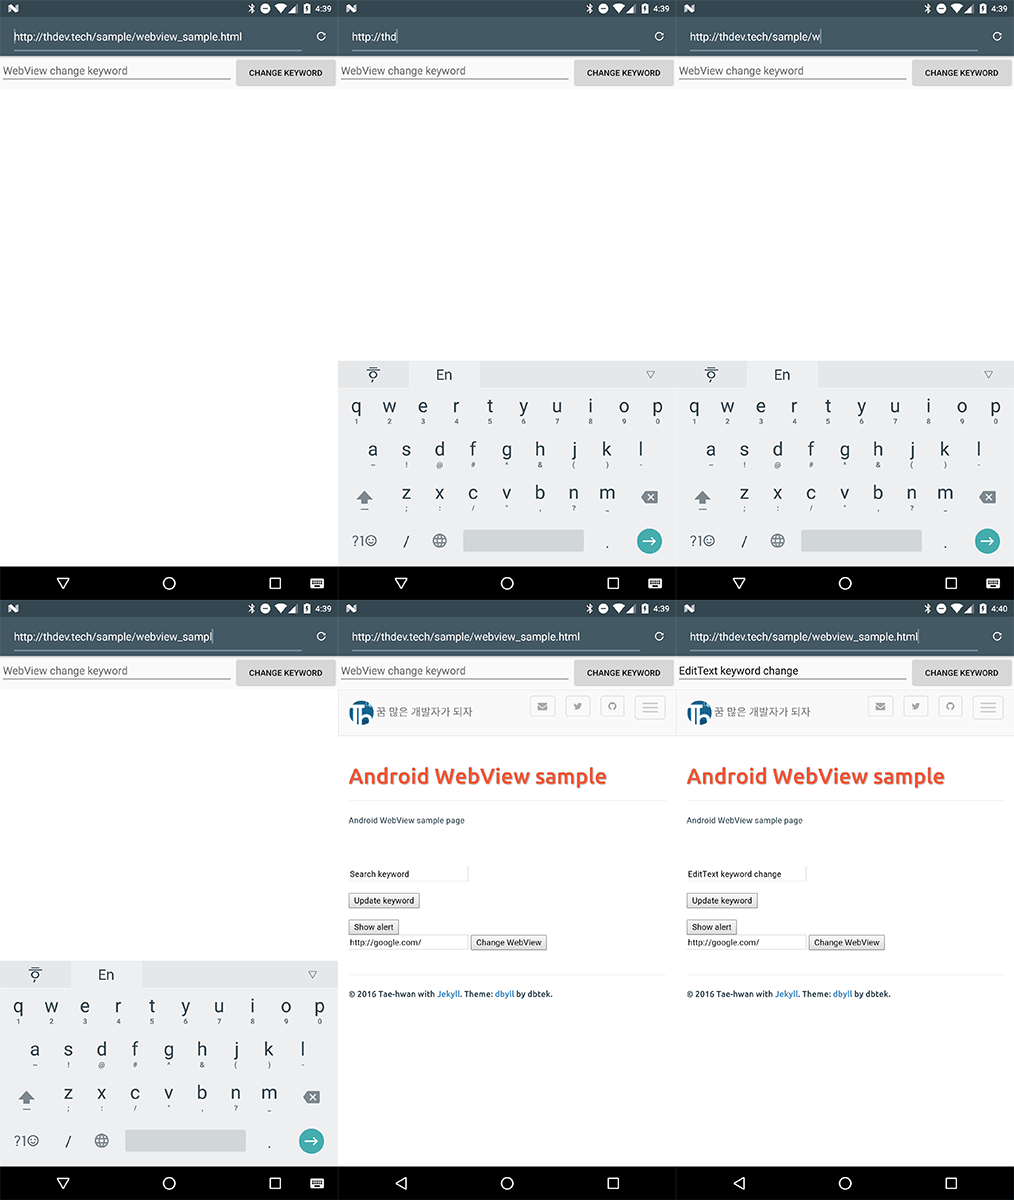
- Fragment의 EditText에서 웹페이지에서 세팅한 값을 확인할 수 있습니다.
위와 같이 정리된 부분을 TestCode를 통해서 부분부분 살펴보겠습니다.
사전 진행
webview 테스트를 진행하기 전 사전 테스트는 다음과 같습니다.
et_url을 찾아서 clearText()를 하고, textType을 진행하는데 DEFAULT_URL을 세팅합니다. 그리고 pressImeActionButton()을 호출합니다. 이는 코드상 setting된 IME_OPTION을 호출하게 됩니다. URL 입력부에 IME event가 세팅되어 있습니다.
그리고 waitWebViewLoad() 함수에서 대기를 진행합니다.
String go = MainFragment.DEFAULT_URL;

// WebView URL 변경
onView(withId(R.id.et_url)).perform(clearText());
onView(withId(R.id.et_url)).perform(typeText(go)).perform(ViewActions.pressImeActionButton());

// wait webview load
waitWebViewLoad();
1. input에 키워드를 입력
다음과 같이 webView에 input 키워드를 컨트롤 할 수 있습니다.
withElement를 통해서 WebView의 element를 찾을 수 있습니다.
findElement는 몇 가지 Type을 제공하고 있는데 가장 많이 사용하는 Type은 다음과 같으며 자세한 내용은 Locator 문서를 참고하세요.
- Locator.NAME : element with name
- Locator.ID : id로 지정한 이름을 찾습니다.
- Locator.XPATH : 예) “/html/body/div/p[@id=’message’]” 와 같은 방법으로 절대 좌표? 형태로 정보를 제공해주는 방법입니다.
onWebView()
        // Find the search keyword element by ID
        .withElement(findElement(Locator.ID, "search_keyword"))
        // Clear previous input
        .perform(clearElement())
        // Enter text into the input element
        .perform(DriverAtoms.webKeys(ANDROID_SCRIPT_CALL));
2. Update keyword 버튼을 누릅니다.
코드상 다음과 같이 Update keyword 버튼을 누를 수 있습니다.
withElement을 이용해서 id가 updateKeywordBtn을 버튼을 찾습니다.
그리고 이어서 perform을 이용하여 webClick()을 호출하게 됩니다.
// WebView test
onWebView()
        // Find the submit button
        .withElement(findElement(Locator.ID, "updateKeywordBtn"))
        // Simulate a click via javascript
        .perform(webClick());
3. Fragment의 EditText에서 웹페이지에서 세팅한 값을 확인할 수 있습니다.
마지막으로 Fragment의 EditText를 확인해주면 간단하게 테스트가 마무리됩니다.
다음과 같이 R.id.et_keyword를 찾아서 check를 해주게 됩니다. matches 함수가 이를 확인하게 되는데 Web에서 세팅하였던 ANDROID_SCRIPT_CALL을 다음과 같이 확인할 수 있습니다.
onView(withId(R.id.et_keyword)).check(matches(withText(ANDROID_SCRIPT_CALL)));
이상이 없다면 다음의 결과와 같음을 확인할 수 있습니다.

해당 부분의 전체 코드입니다.
@Test
public void testWebToAndroidScriptCall() throws Exception {
    String go = MainFragment.DEFAULT_URL;

    // WebView URL 변경
    onView(withId(R.id.et_url)).perform(clearText());
    onView(withId(R.id.et_url)).perform(typeText(go)).perform(ViewActions.pressImeActionButton());

    // wait webview load
    waitWebViewLoad();

    // WebView test
    onWebView()
            // Find the search keyword element by ID
            .withElement(findElement(Locator.ID, "search_keyword"))
            // Clear previous input
            .perform(clearElement())
            // Enter text into the input element
            .perform(DriverAtoms.webKeys(ANDROID_SCRIPT_CALL))
            // Value check. script getValue 'search_keyword'
            .check(webMatches(script("return document.getElementById('search_keyword').value", castOrDie(String.class)), containsString(ANDROID_SCRIPT_CALL)))
            // Find the submit button
            .withElement(findElement(Locator.ID, "updateKeywordBtn"))
            // Simulate a click via javascript
            .perform(webClick());

    onView(withId(R.id.et_keyword)).check(matches(withText(ANDROID_SCRIPT_CALL)));
}
EditText에서 값을 변경하고 WebView에 입력이 되었는지 확인하기
첫 번째와 같은 코드는 다음의 설명에서는 제외합니다.
이번에는 바로 위에서 했던 테스트를 거꾸로 해보려고 합니다.
사용자가 다음과 같은 행동을 했다는 가정을 합니다.
- EditText에 값을 변경
- CHANGE KEYWORD 버튼을 누름
- WebView의 search_keyword에 해당 값이 입력되었는지 확인
1. EditText에 값을 변경
우선 EditText의 값을 변경해보겠습니다.
R.id.et_keyword를 찾아서 기존 값을 clearText() 해주고 typeText()를 통해서 JAVASCRIPT_CALL이라는 String 값을 입력합니다.
onView(withId(R.id.et_keyword)).perform(clearText()).perform(typeText(JAVASCRIPT_CALL));
2. CHANGE KEYWORD 버튼을 누름
이어서 R.id.btn_search을 찾아서 click()을 합니다.
onView(withId(R.id.btn_search)).perform(click());
click()이 일어났을 때는 Fragment에 정의되어 있는 행동이 동작하게 됩니다.
다음과 같은 코드가 동작을 하게 됩니다.
private void setKeyword() {
    loadUrl("javascript:setKeyword('" + etKeyword.getText().toString() + "')");
}
3. WebView의 search_keyword에 해당 값이 입력되었는지 확인
마지막으로 Web에서 해당 값이 갱신되었는지 확인할 수 있습니다.
우선 html에는 다음과 같이 정의되어 있습니다.
<script type="text/javascript">
// Android WebView called. - keyword change
function setKeyword(keyword) {
  document.getElementById("search_keyword").value = keyword;
  document.getElementById("message").innerHTML = keyword;
}
</script>

<!-- ... -->

<p id="message"></p>
<input type="text" id="search_keyword" value="Search keyword" />
javascript의 setKeyword가 호출되면 search_keyword와 message에 값이 입력되게 됩니다.
이번에는 <p>, <input type="text">에 각각 적용한 값을 확인하기 위한 2가지 방법을 설명하기 위해서입니다.
테스트 코드에는 각각 다음의 링크를 통해서 확인 가능하며, 분리되어 있습니다.
- testWebViewUpdateElementByInputText : getElementById를 통해서 값을 비교
- testWebViewUpdateElementByDisplayed : getText()를 통해서 값을 비교
위의 2개의 방법이 사용방법도 다르고 실제 적용되는 부분도 다릅니다.
getElementById를 통하기 때문에Display상태가 아니더라도 값을 확인할 수 있고(input hidden 상태),getText()를 사용하지 않고도 확인이 가능합니다.Element가hidden상태이면 아무것도 찾지 못 합니다. 그리고 기본 동작이value를 가져오는 게 아니라innerHTML을 통해서 값을 가져오기 때문에 2번의 방법으로는 모든 값을 가져오기는 쉽지 않습니다.
저는 input에서도 getText()를 가져올 수 있을 거라고 생각하고 삽질을 하다가 마지막에 getElementById을 이용하는 script를 직접 호출하는 방법으로 해야만 가능하다는 사실을 알았습니다.
이제 onWebView를 이용해서 값을 확인해 보겠습니다.
- getText()
2 번째 방법을 먼저 설명하겠습니다.
2 번째 방법은 간단합니다. findElement를 통해서 message id를 찾고, getText()를 사용하여 가져온 텍스트와 containsString()에서 확인하기 위한 값을 비교하게 됩니다.
값을 정상적으로 불러오고 이상이 없다면 완료가 됩니다.
onWebView()
      // Find the message element by ID
      .withElement(findElement(Locator.ID, "message"))
      // Verify that the text is displayed
      .check(webMatches(getText(), containsString(JAVASCRIPT_CALL)));
만약 withElement에 <p>가 아닌 <input>의 element을 찾도록 한다면 다음과 같은 오류가 발생합니다.
doesn’t match:입니다. Expected는 containing의 값이 출력되지만 Got: ““에는 아무런 값이 오지 않습니다.
android.support.test.espresso.base.DefaultFailureHandler$AssertionFailedWithCauseError: 'a string containing "Web text change"' doesn't match:
Expected: a string containing "Web text change"
Got: ""
만약 정상적으로 값을 가져올 수 있고, containing에 값을 다르게 호출하면
Got:에는 정상적으로 값을 가져옴을 확인할 수 있고, containing에서도 다른 값을 찾고 있음을 확인할 수 있습니다.
android.support.test.espresso.base.DefaultFailureHandler$AssertionFailedWithCauseError: 'a string containing "abc"' doesn't match: Web text change
Expected: a string containing "abc"
Got: "Web text change"
- script를 이용해서 값을 가져온다
script를 이용해서 값을 가져올 경우에는 message이든 search_keyword이든 값을 가져올 수 있습니다. 해당 칼럼에 맞는 script를 작성해서 return 키워드를 사용하기만 하면 됩니다.
위와 다른 점은 withElement가 없습니다. 대신 여기에는 hasElementWithId가 있습니다.
아래에서 에러 나겠지만 검증 코드이므로 다음과 같이 작성하였습니다.
getText()하던 부분이 여기에서는 check와 webMatches, script으로 변경되었습니다. script에는 return이 포함되었고, document.getElementById('search_keyword').value를 달았습니다. 이 return 결과를 String.class로 변경합니다.(다른 Type도 가능합니다.) 변경된 결과를 containsString()을 사용하여 비교하게 됩니다.
onWebView()
    // Find the message element by ID
    .check(webContent(hasElementWithId("search_keyword")))
    .check(webMatches(script("return document.getElementById('search_keyword').value", castOrDie(String.class)), containsString(JAVASCRIPT_CALL)));
오류는 위와 같지만 다른 부분은 이번에는 Got에서 값을 가져올 수 있다는 점입니다.
android.support.test.espresso.base.DefaultFailureHandler$AssertionFailedWithCauseError: 'a string containing "ABC"' doesn't match: Web text change
Expected: a string containing "ABC"
Got: "Web text change"
위의 전체 코드는 아래와 같습니다.
- script를 이용한 경우
@Test
public void testWebViewUpdateElementByInputText() throws Exception {
    String go = MainFragment.DEFAULT_URL;

    onView(withId(R.id.et_url)).perform(clearText());
    onView(withId(R.id.et_url)).perform(typeText(go)).perform(ViewActions.pressImeActionButton());

    waitWebViewLoad();

    onView(withId(R.id.et_keyword)).perform(clearText()).perform(typeText(JAVASCRIPT_CALL));
    onView(withId(R.id.btn_search)).perform(click());

    onWebView()
            //I use this to allow all needed time to WebView to load
            .withNoTimeout()
            // Find the message element by ID
            .check(webContent(hasElementWithId("search_keyword")))
            .check(webMatches(script("return document.getElementById('search_keyword').value", castOrDie(String.class)), containsString(JAVASCRIPT_CALL)));
}
- getText를 이용한 경우
@Test
public void testWebViewUpdateElementByDisplayed() throws Exception {
    String go = MainFragment.DEFAULT_URL;

    onView(withId(R.id.et_url)).perform(clearText());
    onView(withId(R.id.et_url)).perform(typeText(go)).perform(ViewActions.pressImeActionButton());

    waitWebViewLoad();

    onView(withId(R.id.et_keyword)).perform(clearText()).perform(typeText(JAVASCRIPT_CALL));
    onView(withId(R.id.btn_search)).perform(click());

    onWebView()
            // Find the message element by ID
            .withElement(findElement(Locator.ID, "message"))
            // Verify that the text is displayed
            .check(webMatches(getText(), containsString(JAVASCRIPT_CALL)));
}
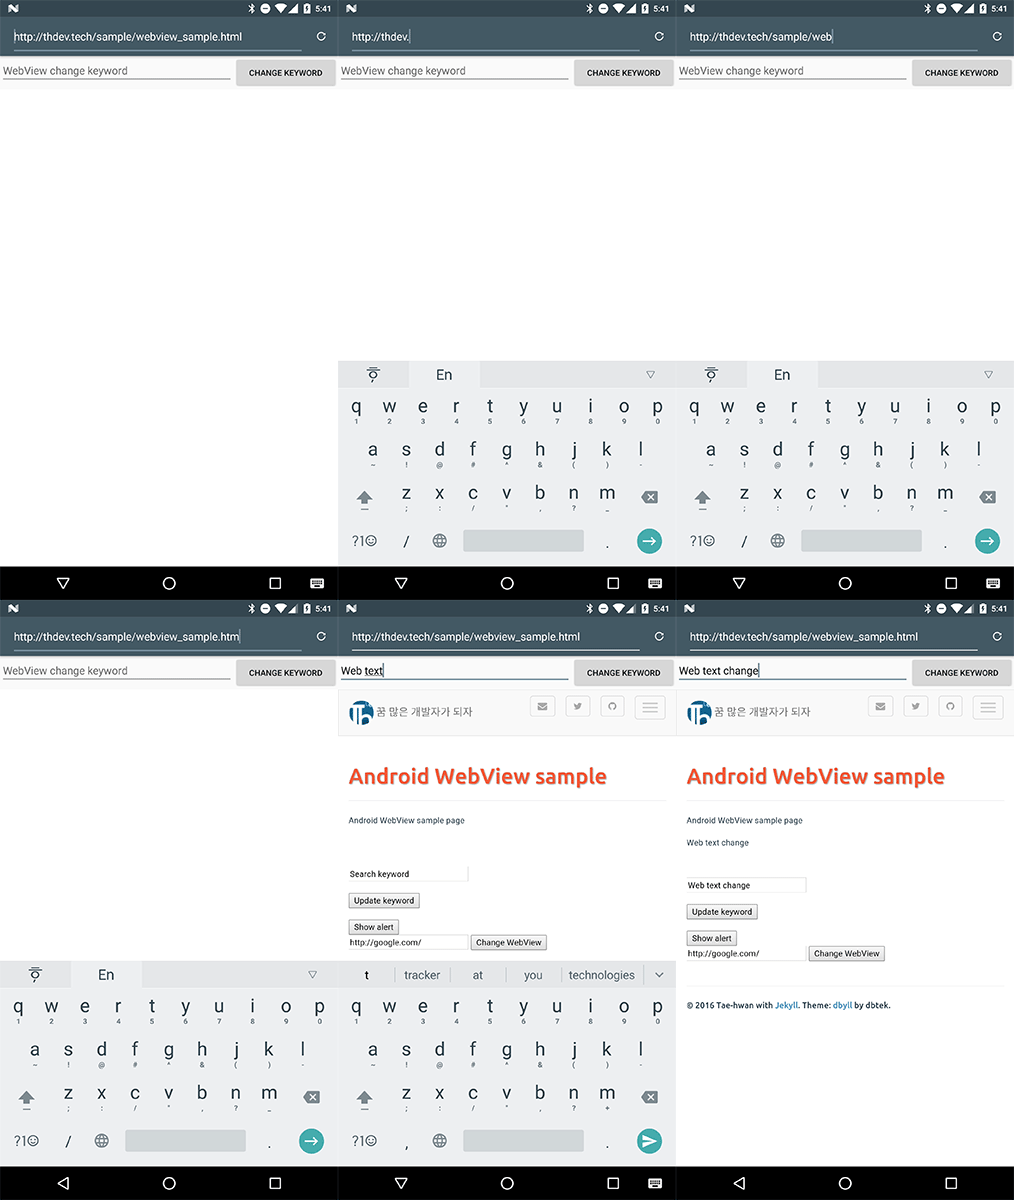
위의 테스트 코드를 동작하면 다음과 같이 확인이 가능합니다.

새로운 Activity 활용하기
새로운 Activity를 활용하는 예제입니다.
다음의 코드에는 함정이 있는데 .. URL이 변경될 수 있습니다. 특히 Google은 각 국가/시스템 언어 등에 대응되어 URL이 변경될 수 있습니다.
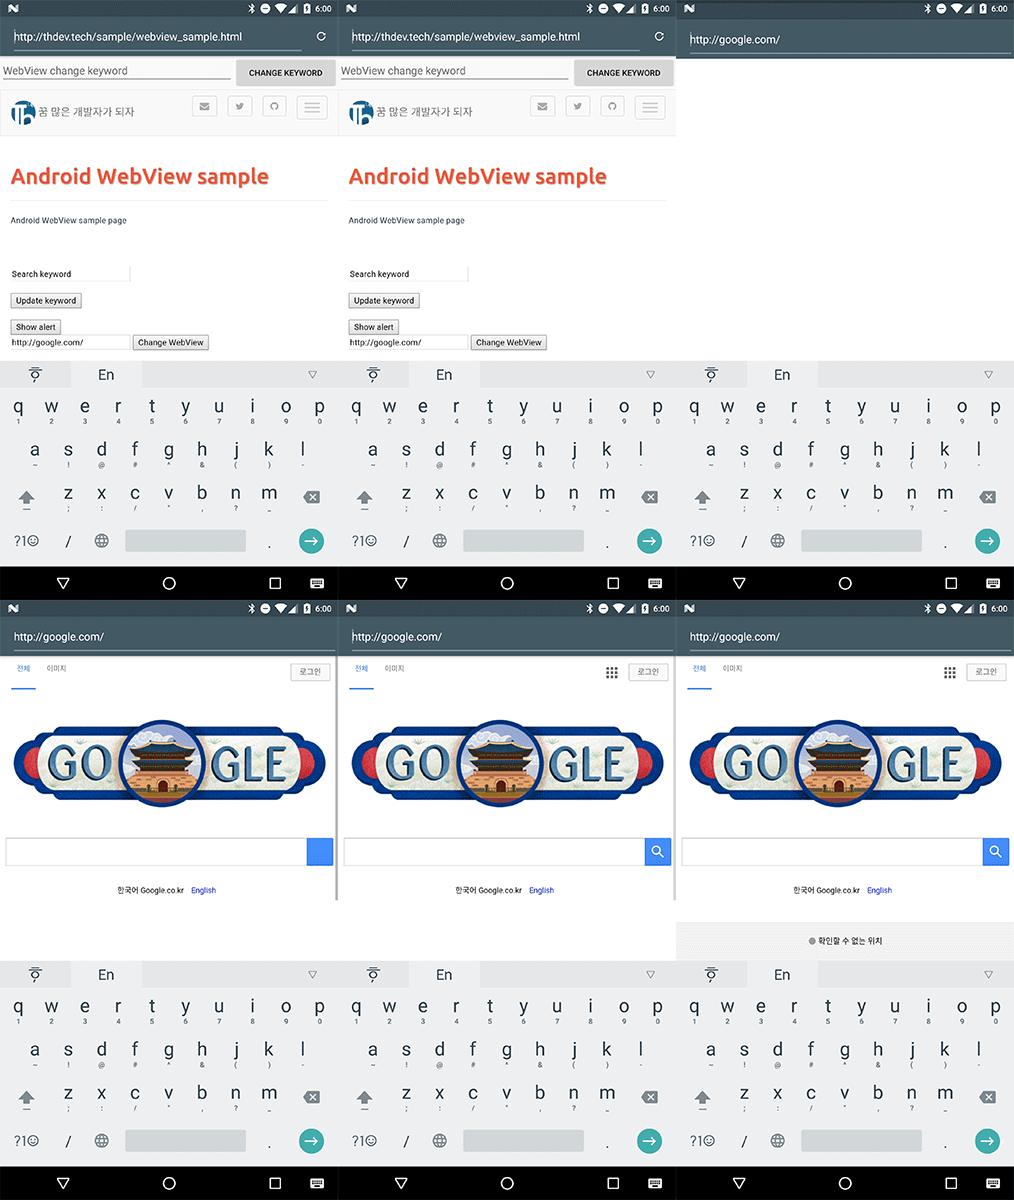
이번에는 가장 기본적인 URL을 변경하는 예제로 changeWebView 버튼이 있고, 이 버튼을 누르면 새로운 창에서 Google이 표시되게 됩니다.
주요 코드를 간단하게 살펴보겠습니다.
Web에 element 중에 url input을 위한 부분이 있습니다. 이 부분에 webKeys을 통해서 “http://google.com/”을 입력하게 됩니다.
그리고 changeWebView의 버튼에 webClick()을 호출합니다. 그리고 잠시 후 새로운 WebView에서 onWebView를 통해서 다시 확인합니다.
@Test
public void testChangeWebViewTest() throws Exception {
   waitWebViewLoad();

   onWebView()
           // Find the search keyword element by ID
           .withElement(findElement(Locator.ID, "url"))
           // Clear previous input
           .perform(clearElement())
           // Enter text into the input element
           .perform(DriverAtoms.webKeys("http://google.com/"))
           // Find the submit button
           .withElement(findElement(Locator.ID, "changeWebView"))
           // Simulate a click via javascript
           .perform(webClick());

   onWebView()
           .check(webMatches(getCurrentUrl(), containsString("http://google.com")));
}
이번의 테스트를 돌리면 Fail이 나게 됩니다.
처음에 요청한 주소랑은 많이 다르게 나옵니다.
Caused by: junit.framework.AssertionFailedError: 'a string containing "http://google.com"' doesn't match: https://www.google.co.kr/?gfe_rd=cr&ei=2YSxV_OPF4jf8Aer3YWwAg&gws_rd=ssl
Expected: a string containing "http://google.com"
Got: "https://www.google.co.kr/?gfe_rd=cr&ei=2YSxV_OPF4jf8Aer3YWwAg&gws_rd=ssl"
아직 url 변경되었을 때 확인하는 방법을 찾지 못 해서 다음과 같이 수정은 가능합니다.
http도 https로 변경되기 때문에 다음과 같이 수정하면 일부 포함하는 단어로 변경되기 때문에 전체는 아니더라도 일부를 찾을 수 있게 됩니다.
onWebView()
     .withNoTimeout()
     .check(webMatches(getCurrentUrl(), containsString("https://www.google")));
테스트 결과는 다음과 같이 확인 가능합니다.

마무리
글 하나로 작성하려고 하였는데 본문이 길어서 다음 글로 이동합니다.
javascript를 add 해서 테스트하거나, Alert Dialog를 자동으로 닫히도록 작업할 수 있는 Android TestCode는 다음 글에서 이어가도록 하겠습니다.
이번 글에서는 간단하게 javascriptInterface를 호출하거나, 거꾸로 javascript를 호출해서 Web과 Android 간의 데이터 전송 테스트를 진행하였고, Activity 전환 테스트 등을 하였습니다.
나머지는 다음 글에서 이어가도록 하겠습니다.
관련 글
- Android WebView javascriptInterface 사용하기
- Android WebView TestCode 작성하기 기본 테스트 진행하기
- Android WebView TestCode 작성하기 확장(Alert, Script 만들어 테스트)
- Android WebView Kotlin Base 코드 정의 살펴보기
- Android WebView Kotlin TestCode 작성하기
Comments