androidTest
- JUnit4, Espresso를 이용한 테스트 코드 작성
본문
Android의 앱 완성도를 높이기 위해서 AndroidTest를 작성하게 됩니다.
오늘은 AndroidTest를 작성하기 위해서 가장 기본적으로 알아야 할 내용을 다루어보겠습니다.
제가 참고한 자료들은 아래와 같습니다.
- Android Testing Support Library - Github 문서
- Testing Support Library - Android 문서
- Android Testing Concepts
- Android user interface testing with Espresso - Tutorial
- Android Studio Tips: Unit Testing 적용하기 (Part 1)
- GDE 정승욱 : Android-MVP-AdapterRoleSample
다음은 Google Github page를 통해서 제공하는 Android Test의 목차입니다.
위와 같은 4가지를 이용하면 Android Testing을 해볼 수 있게 됩니다.
저는 JUnit4와 Espresso를 이용하여 안드로이드 예제를 작성해보려고 합니다.
JUnit4는 widely-used(널리 사용되는) 유닛 테스트 프레임워크이고, Espresso는 UI를 테스트해볼 수 있습니다.
JUnit4와 Espresso을 함께 사용하게 되면 Android UI Test를 다루어 볼 수 있습니다.
Mock Object
Mock Object를 생성하여 Abstract/Interface를 테스트할 수 있는 Mockito입니다.
when, thenReturn을 통해 실제 가상의 함수를 생성하고, 이를 테스트해볼 수 있습니다.

이 글에서는 Mockito를 사용하는 것은 아니고 dexmaker을 dependency에 추가하여 사용합니다.
dexmaker은 Mockito의 class proxy를 지원한다고 합니다.
Android Test 위한 설정
안드로이드 단위 테스트를 하기 위해서 설정해 주어야 할 부분을 살펴보겠습니다.
build.gradle에 다음의 코드가 추가되어야 하는데 android.defaultConfig에 추가하여 테스트 환경을 만들어주게 됩니다.
android {
  ...

  defaultConfig {
    ...

    testInstrumentationRunner "android.support.test.runner.AndroidJUnitRunner"
  }
}
그 외 androidTestCompile을 할 수 있는 dependency들을 추가로 추가해주시면 테스트를 할 수 있는 환경이 만들어지게 됩니다.
위의 코드와 dependency을 추가한 전체 예제 코드는 아래와 같아지게 되며,
android support-annotations의 경우 androidTestCompile에 추가를 하거나, 아래와 같이 추가를 해주어야 합니다.
추가해주어야 하는 이유는 test runner에서 지원하는 support-annotations의 버전과 실제 App에서 사용하는 support-annotations의 버전이 달라 충돌이 일어나게 됩니다.
configurations.all {
    resolutionStrategy {
        force 'com.android.support:support-annotations:23.3.0'
    }
}
저는 androidTestCompile에 support-annotations을 한 줄 추가해주는 방법으로 작성하였고,
다음과 같이 전체 build.gradle의 코드로 가이드를 잡았습니다.
apply plugin: 'com.android.application'

android {
    compileSdkVersion 23
    buildToolsVersion "23.0.3"

    defaultConfig {
        applicationId "tech.thdev.butterKnife_example"
        ...

        testInstrumentationRunner "android.support.test.runner.AndroidJUnitRunner"
    }
}

dependencies {
    // Error:Conflict with dependency 'com.android.support:support-annotations'.
    // Resolved versions for app (23.3.0) and test app (23.1.1) differ.
    // See http://g.co/androidstudio/app-test-app-conflict for details.
    androidTestCompile 'com.android.support:support-annotations:23.3.0'

    // Test dependency
    androidTestCompile 'com.android.support.test:runner:0.5'
    ...
}
JUnit4 Rules
JUnit4는 Android ActivityTestRule과 ServiceTestRule을 테스트할 수 있습니다.
JUnit4에서 제공하는 ActivityTestRule의 예제는 Github page에 나와있는 대로 아래와 같이 작성할 수 있습니다.
JUnit4 ActivityTestRule
@RunWith(AndroidJUnit4.class)
@LargeTest
public class MyClassTest {

    @Rule
    public ActivityTestRule<MyClass> mActivityRule = new ActivityTestRule(MyClass.class);

    @Test
    public void myClassMethod_ReturnsTrue() { ... }
}
JUnit4 ActivityInstrumentationTestCase2
JUnit4 테스트는 아래와 같은 방법으로도 테스트할 수 있는데, 이 방법은 Android Studio를 통해 새로운 프로젝트를 생성할 때 생성된 방법과 같습니다.
위에 것과 다른 부분은 @Rule을 정의하지 않고, InstrumentationRegistry를 이용하게 됩니다.
import android.support.test.runner.AndroidJUnit4;
import android.support.test.runner.AndroidJUnitRunner;
import android.test.ActivityInstrumentationTestCase2;

@RunWith(AndroidJUnit4.class)
public class CalculatorInstrumentationTest
        extends ActivityInstrumentationTestCase2<CalculatorActivity> {

    @Before
    public void setUp() throws Exception {
        super.setUp();

        // Injecting the Instrumentation instance is required
        // for your test to run with AndroidJUnitRunner.
        injectInstrumentation(InstrumentationRegistry.getInstrumentation());
        mActivity = getActivity();
    }

    @Test
    public void typeOperandsAndPerformAddOperation() {
        // Call the CalculatorActivity add() method and pass in some operand values, then
        // check that the expected value is returned.
    }

    @After
    public void tearDown() throws Exception {
        super.tearDown();
    }
}
InstrumentationRegistry에는 다음의 메소드를 포함하고 있고, 사용할 수 있습니다.
- getArguments
- getContext
- getInstrumentation
- getTargetContext
- registerInstance
JUnit4 ServiceTestRule
ServiceTestRule은 다음과 같이 정의하여 사용할 수 있는데, Service bind 방식으로 접근하여 테스트를 해볼 수 있습니다.
@RunWith(AndroidJUnit4.class)
@MediumTest
public class MyServiceTest {

  @Rule
  public final ServiceTestRule mServiceRule = new ServiceTestRule();

  @Test
  public void testWithStartedService() {
      mServiceRule.startService(
          new Intent(InstrumentationRegistry.getTargetContext(), MyService.class));
      // test code
  }

  @Test
  public void testWithBoundService() {
      IBinder binder = mServiceRule.bindService(
          new Intent(InstrumentationRegistry.getTargetContext(), MyService.class));
      MyService service = ((MyService.LocalBinder) binder).getService();
      assertTrue("True wasn't returned", service.doSomethingToReturnTrue());
  }
}
주요 Annotation 살펴보기
예제 코드에서 본 Annotation들을 각각 살펴보도록 하겠습니다.
자세한 내용은
Annotation
- @Before : @Test를 시작하기 전 사전에 진행해야 할 사전 정의에 해당됩니다. @Test가 시작되기 전 항상 호출되게 됩니다.(단위 테스트 포함)
- @After : @After은 모든 테스트가 종료되면 호출되게 됩니다. 메모리에서 resource를 release 할 수 있습니다.
- @Test : @Before가 완료되면 실제 코드 테스트를 진행하게 됩니다.
- @Rule : 해당 Test class에서 사용하게 될 ActivityTestRule과 ServiceTestRule에 대하여 정의하게 됩니다.
- @BeforeClass, @AfterClass : public static method로 정의하여야 하며, @Before, @After와 동일하게 한 번씩만 실행되게 됩니다.
- @Test(timeout=
) : @Test 룰에 대한 timeout을 지정하게 됩니다. timeout 안에 테스트가 완료되지 않으면 fail이 되며, time은 milliseconds으로만 사용할 수 있습니다. 예) @Test(timeout=500) - @RequiresDevice : 에뮬레이터를 사용하지 않고 기기만 사용할 수 있습니다.
- @SdkSupress : minSdkVersion을 지정할 수 있습니다.
- @SmallTest, @MediumTest, @LargeTest : 테스트 성격을 구분하여 테스트할 수 있습니다.
문서 - JUnit annotations
Espresso
JUnit4는 Activity/Service를 테스트하기 위한 것이고, UI를 테스트하기 위해서는 추가로 Espresso를 사용해야 합니다.
Espresso에 대한 dependency를 아래와 같이 추가해주어야 합니다.
androidTestCompile 'com.android.support.test.espresso:espresso-core:2.2.2'
androidTestCompile 'com.android.support.test:runner:0.5'
Espresso를 통해 Intent 테스트도 가능한데 Intent를 테스트하기 위한 dependency는 다음과 같이 추가로 작성해주시면 되겠습니다.
androidTestCompile 'com.android.support.test:runner:0.5'
androidTestCompile 'com.android.support.test:rules:0.5'
androidTestCompile 'com.android.support.test.espresso:espresso-core:2.2.2'
androidTestCompile 'com.android.support.test.espresso:espresso-intents:2.2.2'
Espresso를 통해 테스트할 수 있는 예제입니다.
첫 번째 줄 : withText를 통해 Hello World!를 가진 View를 찾고 화면에 표시되었는지를 확인합니다. 두 번째 줄 : withId를 통해 R.id.view를 찾고, 화면에 표시되었는지를 확인합니다. 세 번째 줄 : withId를 통해 R.id.view를 찾고, 클릭 이벤트를 처리합니다.
@RunWith(AndroidJUnit4.class)
@LargeTest
public class HelloWorldEspressoTest {

    @Rule
    public ActivityTestRule<MainActivity> mActivityRule = new ActivityTestRule(MainActivity.class);

    @Test
    public void listGoesOverTheFold() {
        onView(withText("Hello world!")).check(matches(isDisplayed()));
        onView(withId(R.id.view)).check(matches(isDisplayed()));
        onView(withId(R.id.view)).perform(click());
    }
}
위의 예제의 @Test 부분의 코드에서 사용한 메소드는 아래와 같습니다.
- onView : View 처리(TestView, EditText, Button 등)
- withText : 해당 텍스트 “Hello world!”를 가지는 View를 찾습니다.
- withId : R.id.view에 해당하는 View를 찾습니다.
- perform : ViewAction을 처리합니다.
- click : 아이템을 클릭하는 이벤트를 처리합니다.
- check(matches()) : ViewAssertion 유효성을 체크하고, 맞는지 확인합니다.
- isDisplayed : 화면에 노출 상태를 가져옵니다.
EditText, Button Click Event
아래 예는 Activity 2개를 이용하여 EditText의 데이터를 전달하는 예제입니다.
실제 Activity에 버튼 이벤트에는 Intent에 값을 세팅하도록 만들어져있고, B Activity에서는 이를 받아 TextView에 출력하는 예제입니다.
@Test
public void testChangeTextToSecondActivity() throws Exception {
    // Type text and then press the button.
    onView(withId(R.id.et_message)).perform(clearText());
    onView(withId(R.id.et_message)).perform(typeText("Change Activity ..."), closeSoftKeyboard());

    onView(withId(R.id.btn_second_activity)).perform(click());

    onView(withId(R.id.tv_message)).check(matches(withText("Change Activity ...")));
}
- et_message에 clearText를 하여 값을 지웁니다.
- et_message에 typeText를 입력하고, 키보드를 숨깁니다.
- btn_second_activity를 눌러 Intent를 전달합니다.
- B Activity의 tv_message에서 전달받은 메시지가 잘 출력되었는지 확인합니다.
ButterKnife를 이용한 AndroidTest 예제
AndroidTest를 테스트하기 위해서 예제를 하나 작성하였습니다.
ButterKnife 8.0.1과 Retrofit 2.0.2를 사용하였고, MVP로 작성해보았습니다.
제가 작성한 테스트는 MVP의 Presenter를 테스트하고, Activity의 BottomSheet를 테스트하였습니다.
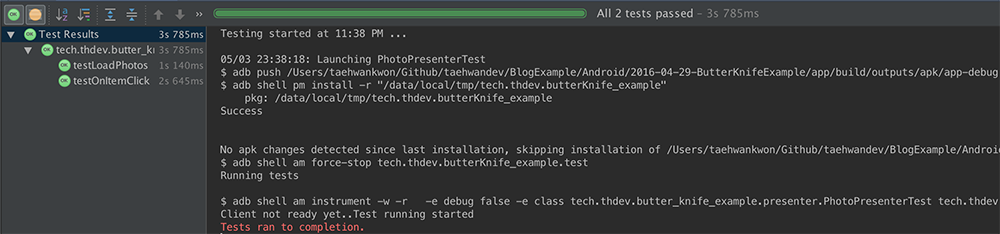
일단 작성한 예제를 ctrl + shift + r(테스트 실행)을 통해 확인한 결과는 아래와 같이
Test run to completion와 왼쪽 OK 아이콘을 확인할 수 있습니다.
dependency 추가
dependency에는 아래와 같은 코드를 추가하였습니다.
Presenter를 테스트하기 위해서 dexmaker-mockito를 추가해주었고, await을 사용하기 위해서 awaitility를 추가하였습니다.
ext {
    supportLibVersion = '23.3.0'

    testRunnerVersion = '0.5'
    espressoVersion= '2.2.2'
    dexmakerVersion = '1.4'
}

androidTestCompile "com.android.support:support-annotations:${supportLibVersion}"
androidTestCompile "com.android.support.test:runner:${testRunnerVersion}"
androidTestCompile "com.android.support.test:rules:${testRunnerVersion}"
androidTestCompile "com.android.support.test.espresso:espresso-core:${espressoVersion}"
androidTestCompile "com.crittercism.dexmaker:dexmaker-mockito:${dexmakerVersion}"
androidTestCompile 'com.jayway.awaitility:awaitility:1.7.0'
Presenter 테스트
Presenter를 테스트하기 위해서 mockito를 사용하였습니다. View와 DataModel에 대한 mock을 생성해주었습니다.
@Before 단계에서 Presenter 관련 코드들을 모두 초기화하였습니다.
private PhotoPresenter photoPresenter;
private PhotoPresenterView photoPresenterView;
private PhotoDataModel photoDataModel;

@org.junit.Before
public void setUp() throws Exception {
    photoPresenterView = mock(PhotoPresenterView.class);
    photoDataModel = mock(PhotoDataModel.class);
    photoPresenter = new PhotoPresenter(photoPresenterView, RetrofitBinder.getRetrofitBinder(), photoDataModel);
}
Retrofit을 이용하여 Yahoo의 Image를 불러오는 예제이며, 이를 테스트하기 위해서 아래와 같이 작성하였습니다.
원래는 정승욱님의 테스트 코드를 참고하여 작성하였고, RxJava/레트로 람다를 사용하셨었지만 아래와 같이 변경하였습니다.
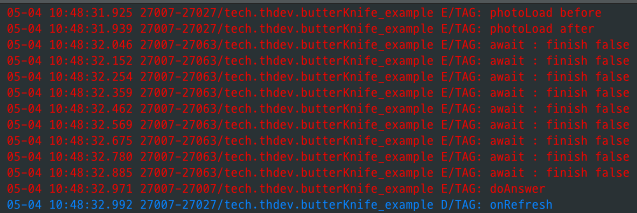
doAnswer에는 onRefresh가 정상적으로 동작할 경우 finish[0]을 true로 변경하게 됩니다.
await() 함수를 통해 finish[0]이 true로 변경되기 전까지 대기하게 됩니다.
loadPhotos에는 onRefresh가 타게 되고, doAnswer에서 onRefresh가 탔기에 finish[0]을 true로 변경하는 과정을 거칩니다.
마지막에는 실제 verify를 통해 onRefresh가 탔는지 확인하게 됩니다.
@org.junit.Test
public void testLoadPhotos() throws Exception {
  final boolean[] finish = {false};
  doAnswer(new Answer() {
      @Override
      public Object answer(InvocationOnMock invocationOnMock) throws Throwable {
          finish[0] = true;
          return invocationOnMock;
      }
  }).when(photoPresenterView).onRefresh();

  photoPresenter.loadPhotos(1);

  await().until(new Runnable() {
      @Override
      public void run() {
          while (!finish[0]) {
              verify(photoDataModel, atLeastOnce()).add((Photo) any());
          }
      }
  });
  verify(photoPresenterView).onRefresh();
}
위의 코드에 Log를 남기게 되면 다음과 같이 확인할 수 있습니다.
Presenter - onItemClick 예제
mock을 이용한 onItemClick 예제입니다.
예제를 작성해놓고 보니 하나 문제가 있습니다. 실제론 photo는 null이 됩니다.
load 하는 부분은 mock으로 구현하였고, when(photoDataModel.getPhotoItem(position))이 호출되면 thenReturn의 photo를 return 하게 됩니다.
photoItemClick(position)을 넘겨주면 바로 위에서 when으로 작성한 photo를 찾게 되고, 이를 onBottomSheetShow에 넘겨주게 됩니다.
onBottomSheetShow에서 값이 잘 넘어갔는지 확인을 해주는 예제입니다.
@org.junit.Test
public void testOnItemClick() throws Exception {
    loadPhotos();

    final int position = 0;
    Photo photo = photoDataModel.getPhotoItem(position);
    when(photoDataModel.getPhotoItem(position)).thenReturn(photo);

    // when
    photoPresenter.photoItemClick(position);

    // then
    verify(photoPresenterView).onBottomSheetShow((Photo) any());
}
Activity Test
Presenter 테스트를 하였으니 Activity Test를 해보도록 하겠습니다.
Activity는 BottomSheet를 확장하고, HIDDEN 하는 예제입니다.
사전 설정을 위해서 @Before에서 아래와 같이 작성하였습니다.
adapter의 size가 0 보다 커질 때 까지를 기다리도록 await을 구현하고, 실제 데이터를 다 불러오면 @Test가 진행되게 됩니다.
@Before
public void setUp() throws Exception {
    activity = rule.getActivity();
    await().until(new Runnable() {
        @Override
        public void run() {
            // adapter size > 0
            while (!(activity.adapter.getSize() > 0)) {

            }
        }
    });
}
@Test는 BottomSheet에 0 번째 아이템을 setImage 처리하고, BottomSheet를 확장, 축소하는 예제입니다.
signal을 이용하여 1초의 딜레이를 주어 잘 보이도록 처리하였습니다.
@Test
public void testShowBottomSheet() throws Throwable {
  rule.runOnUiThread(new Runnable() {

      @Override
      public void run() {
          activity.photoPresenter.photoItemClick(0);
      }
  });

  signal.await(1, TimeUnit.SECONDS);

  activity.bottomSheetBehavior.setState(BottomSheetBehavior.STATE_EXPANDED);

  signal.await(1, TimeUnit.SECONDS);

  activity.bottomSheetBehavior.setState(BottomSheetBehavior.STATE_HIDDEN);
}
마무리
간단하게 JUnit4와 Espresso을 살펴보았습니다.
ImageView에 대한 부분도 확인해보려고 하였으니 Robolectric 또는 다른 분들이 만든 커스텀 테스트를 이용하여야 하였습니다.
우선 이번에는 살펴보지 않고, 아래 링크를 참고해주시면 되겠습니다.
AndroidTest는 정승욱 님이 작성한 Android-MVP-AdapterRoleSample을 참고하여 작성하였습니다.
Comments