Android Studio에서 Swipe View 만들기
개인 광고 영역
2013년에 작성하였던 Android Swipe View 생성하는 글을 Android Studio에서 하는 방법으로 다시 정리하였습니다.
Android 3.0부터 제공하는 Swipe Views와 Tabs + Swipe를 간단하게 생성하고 적용할 수 있습니다. 그 외 Android에서 제공하는 최신 UI도 간단하게 새로운 프로젝트를 생성함으로써 적용이 가능해졌습니다.
오늘 작성할 Swipe View는 탭을 포함하고, Fragment로 좌우로 이동하는 뷰를 가지고 있습니다.
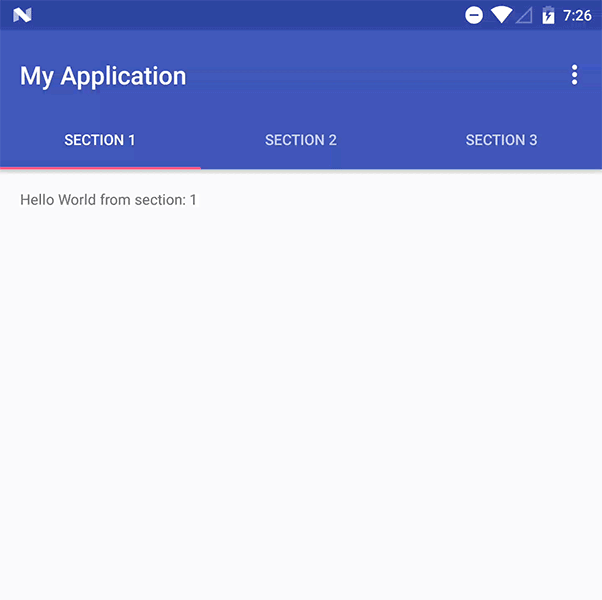
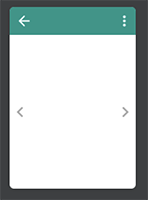
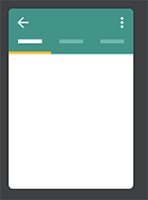
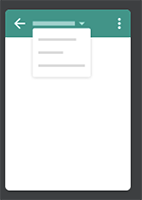
생성하면 아래와 같은 결과를 기본으로 확인할 수 있습니다.
각각을 정의해보자
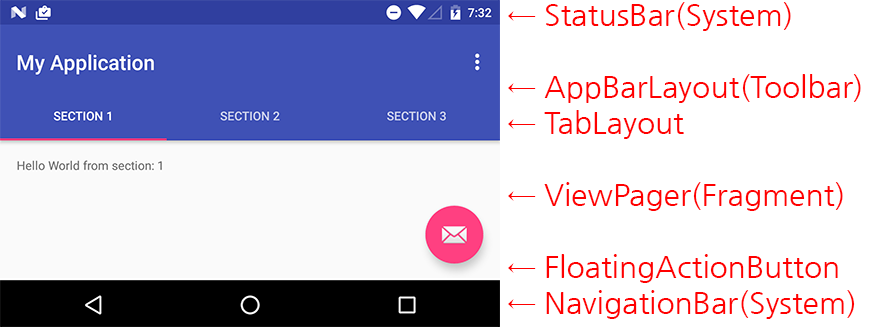
레이아웃 구성을 살펴보기 전에 먼저 아래와 같이 정리해보았습니다.
시스템의 영역을 제외하고, 순서대로 보면 AppBarLayout이 기본적으로 생성됩니다.
AppBarLayout : ToolBar와 TabLayout을 가집니다.
ViewPager : Fragment로 구성된 각각의 페이지를 확인할 수 있습니다.
FloatingActionButton : 하단의 이메일 아이콘
기본으로 생성한 Swipe ViewPager의 모습은 위와 같습니다.
프로젝트를 생성해보자
살펴보기 전에 먼저 프로젝트를 생성해봅시다.
안드로이드는 기본 프로젝트 생성만 하더라도 아래와 같이 다양한 UI를 간단하게 생성해볼 수 있습니다.
안드로이드 초보더라도 여기서부터 시작한다면 안드로이드에서 제공하는 다양한 UI를 간단하게 만들어 볼 수 있습니다.
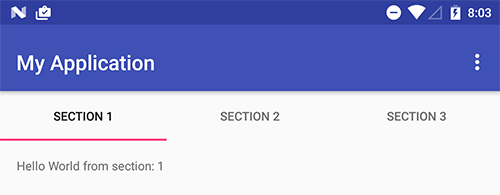
위에서 보았던 UI를 생성해보겠습니다.
먼저 안드로이드 스튜디오에서 새로운 프로젝트 생성을 눌러줍니다.
그러면 다양한 UI를 선택할 수 있습니다.
최근에는 Basic Activity를 주로 생성하지만 이것 외에도 Bottom Navigation Activity을 생성해볼 수도 있습니다. 당연히 Target의 영향을 받겠지만 아래 사진은 Target API 25 이상으로 선택한 상태입니다.
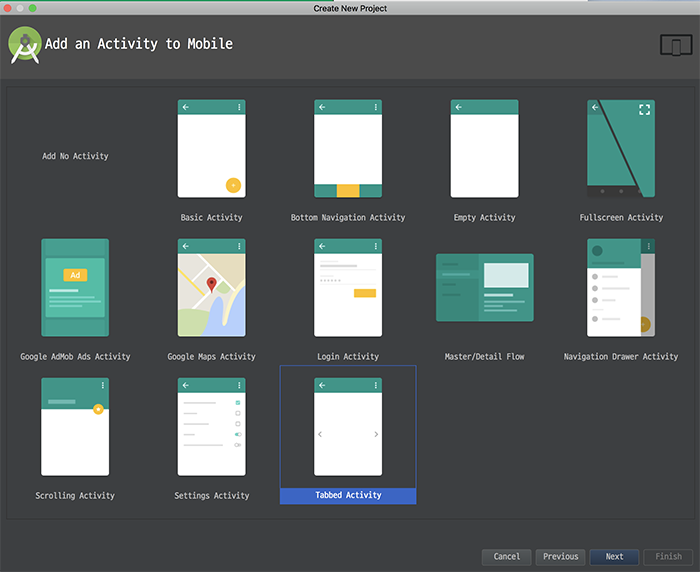
이 중에서 Tabbed Activity를 골라줍니다.
그러면 아래와 같은 화면을 볼 수 있습니다.
이 중에 Navigation Style을 골라주어야 합니다.
Navigation Style은 3가지를 확인할 수 있습니다.
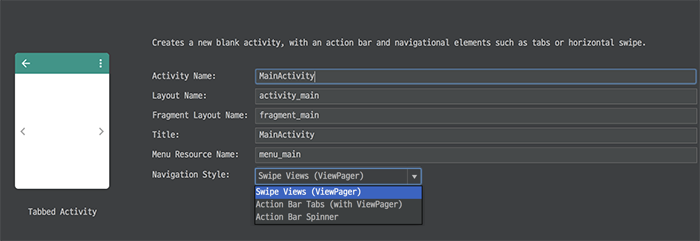
Swipe Views(ViewPager): 뷰 페이저를 활용한 Swipe가 가능한 View를 생성Action Bar Tabs (with ViewPager): 기본 Swipe와 Tabs을 모두 가지는 View입니다.Action Bar Spinner: 거의 활용할 일이 없지만 Spinner가 함께 포함됩니다.
저는 이 중에서 2번째 스타일을 선택하였습니다.
Support Library 살펴보기
과거 안드로이드는 시스템 내장되어 있는 라이브러리들을 사용하였습니다.
하지만 지금의 안드로이드는 대부분 Support Library의 의존성을 가지고 있습니다.
별도의 라이브러리를 배포해주고 있는데 이러한 라이브러리를 사용해야 정상적으로 앱 개발이 가능합니다.
그래서 이번 프로젝트에서는 어떠한 SupportLibrary을 사용하였는지 확인하려면 build.gradle을 열어서 아래와 같음을 확인할 수 있습니다.
dependencies {
    compile 'com.android.support:appcompat-v7:25.3.1'
    compile 'com.android.support:design:25.3.1'
}
2개의 라이브러리가 추가되어 있음을 확인할 수 있습니다.
appcompat-v7과 design 서포트 라이브러리입니다. 이 2개를 통해 다음의 새로운 프로젝트의 빌드와 동작이 가능하게 됩니다.
Layout 살펴보기
레이아웃은 2개가 생성됩니다.
위에서 봤던 그림을 한 번 더 보고 Layout을 보겠습니다.
먼저 ViewPager의 안에 포함된 Fragment 레이아웃은 별도의 파일로 생성해주었습니다.
activity_main.xml을 열어보면 아래와 같은 코드를 확인 해볼수 있습니다.
<?xml version="1.0" encoding="utf-8"?>
<android.support.design.widget.CoordinatorLayout xmlns:android="http://schemas.android.com/apk/res/android"
    xmlns:app="http://schemas.android.com/apk/res-auto"
    xmlns:tools="http://schemas.android.com/tools"
    android:id="@+id/main_content"
    android:layout_width="match_parent"
    android:layout_height="match_parent"
    android:fitsSystemWindows="true"
    tools:context="tech.thdev.myapplication.MainActivity">

    <android.support.design.widget.AppBarLayout
        android:id="@+id/appbar"
        android:layout_width="match_parent"
        android:layout_height="wrap_content"
        android:paddingTop="@dimen/appbar_padding_top"
        android:theme="@style/AppTheme.AppBarOverlay">

        <android.support.v7.widget.Toolbar
            android:id="@+id/toolbar"
            android:layout_width="match_parent"
            android:layout_height="?attr/actionBarSize"
            android:background="?attr/colorPrimary"
            app:layout_scrollFlags="scroll|enterAlways"
            app:popupTheme="@style/AppTheme.PopupOverlay">

        </android.support.v7.widget.Toolbar>

        <android.support.design.widget.TabLayout
            android:id="@+id/tabs"
            android:layout_width="match_parent"
            android:layout_height="wrap_content" />

    </android.support.design.widget.AppBarLayout>

    <android.support.v4.view.ViewPager
        android:id="@+id/container"
        android:layout_width="match_parent"
        android:layout_height="match_parent"
        app:layout_behavior="@string/appbar_scrolling_view_behavior" />

    <android.support.design.widget.FloatingActionButton
        android:id="@+id/fab"
        android:layout_width="wrap_content"
        android:layout_height="wrap_content"
        android:layout_gravity="end|bottom"
        android:layout_margin="@dimen/fab_margin"
        app:srcCompat="@android:drawable/ic_dialog_email" />

</android.support.design.widget.CoordinatorLayout>
많은 코드를 담고 있는데 hierarchy을 뜯어보도록 하겠습니다.
먼저 Main View는 CoordinatorLayout이 담당합니다.
CoordinatorLayout은 기존 FrameLayout의 강력함을 업 한 레이아웃이라고 설명합니다.
FrameLayout은 레이아웃 자체를 겹치는 게 가능한 UI입니다.(동율 선상에 각각의 View의 사이즈를 정의할 수 있습니다.)
그리고 위치도 조절 할 수 있습니다.(FrameLayout에서는 불가능하죠)
CoordinatorLayout 안에는 AppBarLayout을 포함합니다. 이 AppBarLayout이 있어야 Toolbar와 TabLayout 등을 담을 수 있습니다.
CoordinatorLayout에 AppBarLayout을 포함하는 경우에는 간단한 Animation 정의를 통해 행동을 정의할 수 있습니다.
스크롤 시에 툴바를 숨기거나, 고정시키는 등의 행동을 모두 할 수 있습니다.
ActionBar라고도 불리고, Toolbar라고도 불리는 녀석입니다.
현재 화면의 앱 제목을 붙이거나, 메뉴를 붙일 수 있습니다. 커스텀 역시 가능하죠.
이번 글에서 말하는 Tab을 담게 됩니다.
TabLayout을 AppBarLayout에 포함하게 되면, AppBarLayout 레이아웃에 정의하는 behavior 정의에 따라서 움직이게 됩니다.
이 경우는 애니메이션에서 유용합니다.
TabLayout의 샘플 코드에서는 ViewPager 안에 포함할 수 있다는 설명도 되어 있으니, 필요한 방법에 따라서 다양하게 접근 가능합니다.
<android.support.v4.view.ViewPager
     android:layout_width="match_parent"
     android:layout_height="match_parent">

     <android.support.design.widget.TabLayout
         android:layout_width="match_parent"
         android:layout_height="wrap_content"
         android:layout_gravity="top" />

 </android.support.v4.view.ViewPager>
위의 코드를 사용한다고 하더라도 현재 샘플에서 만들어진 코드와 같은 식으로 노출됩니다.
FloatingActionButton은 사진상 오른쪽 하단에 붙어 있는 버튼입니다.
이 버튼은 ViewPager와는 무관하게 동작합니다.
ViewPager에 붙어 있는 것이 아닌 CoordinatorLayout에 붙어있는 버튼이기 때문입니다.
역시 ViewPager의 내부 스크롤이 발생하면 이에 따른 behavior을 정의할 수 있습니다.
fragment_main.xml 살펴보기
Fragment에서 사용하는 간단한 UI입니다.
RelativeLayout으로 작성되어 있고, 간단하게 TextView를 담고 있습니다.
<RelativeLayout xmlns:android="http://schemas.android.com/apk/res/android"
    xmlns:tools="http://schemas.android.com/tools"
    android:layout_width="match_parent"
    android:layout_height="match_parent"
    android:paddingBottom="@dimen/activity_vertical_margin"
    android:paddingLeft="@dimen/activity_horizontal_margin"
    android:paddingRight="@dimen/activity_horizontal_margin"
    android:paddingTop="@dimen/activity_vertical_margin"
    tools:context="tech.thdev.myapplication.MainActivity$PlaceholderFragment">

    <TextView
        android:id="@+id/section_label"
        android:layout_width="wrap_content"
        android:layout_height="wrap_content" />

</RelativeLayout>
PagerAdapter 상속 클래스 살펴보기
ViewPager는 View입니다.
이 View에서 사용할 PagerAdapter을 구성해주어야 ViewPager에서 이에 맞는 UI를 노출해주게 됩니다.
그래서 PagerAdapter을 상속받아서 이를 구현해주어야 하는 것이죠.
구현하는 조건에는 SupportFragmentManager을 추가해주어야 합니다.
시스템의 기본 UI는 FragmentManager()라는 게 있습니다. 이는 SupportLibrary을 사용하지 않는 과거의 UI입니다.(OS 버전에 따라서 다르게 동작합니다.)
SectionsPagerAdapter는 각각의 ViewPager에 뿌려질 데이터를 담고 있습니다.
layout에서 container라는 이름을 찾고(ViewPager) 이를 setAdapter를 해주면 SectionsPagerAdapter에서 정의하는 방식대로 데이터를 처리하게 됩니다.
// Create the adapter that will return a fragment for each of the three
// primary sections of the activity.
mSectionsPagerAdapter = new SectionsPagerAdapter(getSupportFragmentManager());

// Set up the ViewPager with the sections adapter.
mViewPager = (ViewPager) findViewById(R.id.container);
mViewPager.setAdapter(mSectionsPagerAdapter);
SectionsPagerAdapter는 FragmentPagerAdapter라는 녀석을 상속받고 있습니다.
FragmentPagerAdapter는 support.v4.app.Fragment를 상속받는 Fragment를 불러와서 화면을 만들어주게 됩니다.
생성자 포함하여 3개의 기본 메소드를 상속을 받아주는데, getPageTitle은 별도로 추가가 가능합니다.
- SectionsPagerAdapter(FragmentManager fm) : 슈퍼에 FragmentManager을 넘겨준다
- getItem(int position) : Fragment를 생성하여 return 한다
- getCount() : ViewPager에 노출할 전체 아이템의 숫자
- getPageTitle(int position) : 옵션 값이며, 제목을 정의할 수 있다
import android.support.v4.app.FragmentPagerAdapter;

/**
 * A {@link FragmentPagerAdapter} that returns a fragment corresponding to
 * one of the sections/tabs/pages.
 */
public class SectionsPagerAdapter extends FragmentPagerAdapter {

    public SectionsPagerAdapter(FragmentManager fm) {
        super(fm);
    }

    @Override
    public Fragment getItem(int position) {
        // getItem is called to instantiate the fragment for the given page.
        // Return a PlaceholderFragment (defined as a static inner class below).
        return PlaceholderFragment.newInstance(position + 1);
    }

    @Override
    public int getCount() {
        // Show 3 total pages.
        return 3;
    }

		/**
		 * 옵션 정의라서 없어도 무관하지만, TabLayout에 아무것도 노출하지 않게 됩니다.
		 */
    @Override
    public CharSequence getPageTitle(int position) {
        switch (position) {
            case 0:
                return "SECTION 1";
            case 1:
                return "SECTION 2";
            case 2:
                return "SECTION 3";
        }
        return null;
    }
}
Fragment 코드 살펴보기
Fragment는 아래와 같이 정의할 수 있습니다.
newInstance라는 static 메서드를 생성하여 정의하고, Fragment에 대한 new를 정의해주는 게 좋습니다. 싱글톤의 Fragment를 만드는 것은 아닙니다.
onCreateView에서 inflater의 inflate를 통해 레이아웃을 정의해주고 있습니다.
/**
 * A placeholder fragment containing a simple view.
 */
public static class PlaceholderFragment extends Fragment {
    /**
     * The fragment argument representing the section number for this
     * fragment.
     */
    private static final String ARG_SECTION_NUMBER = "section_number";

    public PlaceholderFragment() {
    }

    /**
     * Returns a new instance of this fragment for the given section
     * number.
     */
    public static PlaceholderFragment newInstance(int sectionNumber) {
        PlaceholderFragment fragment = new PlaceholderFragment();
        Bundle args = new Bundle();
        args.putInt(ARG_SECTION_NUMBER, sectionNumber);
        fragment.setArguments(args);
        return fragment;
    }

    @Override
    public View onCreateView(LayoutInflater inflater, ViewGroup container,
                             Bundle savedInstanceState) {
        View rootView = inflater.inflate(R.layout.fragment_main, container, false);
        TextView textView = (TextView) rootView.findViewById(R.id.section_label);
        textView.setText(getString(R.string.section_format, getArguments().getInt(ARG_SECTION_NUMBER)));
        return rootView;
    }
}
마무리
2013년에 작성한 글에 비해서 많은 변화가 있었습니다. 그래서 다시 한번 정의하였습니다.
하지만 그때와는 다른 점이 더 이상 4.0 아래 버전을 생각하지 않아도 되었다는 점입니다.
그래서 Support Library을 사용하는데 있어서 크나큰 문제도 없죠. 툴도 달라졌으니…
간단하게 새로운 프로젝트를 통해 다양한 UI를 미리 맛볼 수 있으니 Android Studio을 통해 새로운 UI를 살펴보시기를 추천드립니다.
감사합니다.
Comments